Quick Directions:
PLEASE READ THESE BEFORE USING YOUR UNSCREW-UMS ® TO REMOVE THE STUB OF A BROKEN SCREW (FOR THE APPLICATIONS AND MORE INFORMATIONS, SEE THE FULL DIRECTIONS IN THE MANUAL ON OUR WEBSITE,
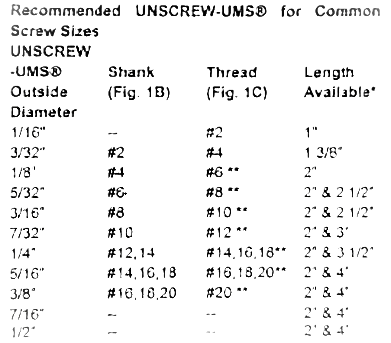
1). Choose the correct size UNSCREW-UMS ® using the chart below. If you do not know the wire size of your screw, see section B,3 in our website manual. Please heed the hardened screw warning. Also, before extracting a broken screw from a valuable piece of wood, it may be helpful to practice by removing a stub from some scrap.
2). Recommended UNSCREW-UMS ® for Common Screw Sizes:
UNSCREW-UMS ®
Outside Diameter Shank
Shank
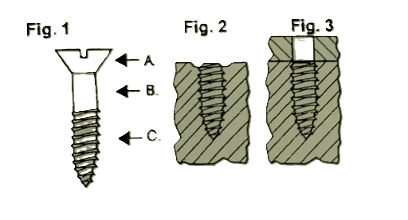
(Fig. 1B)Thread
(Fig. 1C)Length Available
*NOTE: Your skill and familiarity with the UNSCRE-UMS ® may influence your choice of sizes. If in doubt, choose a larger one and work down to smaller sizes, as you become more proficient
**Note: For hardened screws of this wire size, use an UNSCREW-UMS ® which has a 1/16" larger O.D. than that shown
3). Put the UNSCREW-UMS ® into a variable speed, reversable drill or, with UNSCREW-UMS ® ¼" or smaller, a bit brace. WEAR EYE PROTECTION WHEN USING UNSCREW-UMS ®!
4). We prefer to put one jaw of the drill chuck into the slot of the UNSCREW-UMS ®, so it cannot slip in the jaws. We also like to put the UNSCREW-UMS ® about ¼" into the chuck and tighten the jaws. This is not always possible because the UNSCREW-UMS ® will wobble when the drill starts. This is normal, but it should not be excessive.
5). If the amount of the wobble is excessive, the fastest way to reduce it is to set the UNSCREW-UMS ® deeper, 1" or more, into the drill's chuck. Also, the wobble may be reduced by changing the position of the slot in the chuck, for example, on or off a jaw, on a different jaw, or in different gaps.
6). Setting the UNSCREW-UMS ® deeper in the chuck will eliminate the wobble, but there may there may not be enough showing to extract the screw stub. We have used a long length UNSCREW-UMS ® to solve this problem. Contact us if you can't reduce the wobble to a workable level. We will replace any UNSCREW-UMS ® which cannot be adjusted properly.
7). Poke the UNSCREW-UMS ® into the screw hole (see full directions if the screw is flush with the wood). The wobble should dampen itself out.
8). Run the drill slowly – you should be able to see the slot or think you can see it. A little smoke is ok; lots of smoke means the drill is running too fast. Larger UNSCREW-UMS ® 5/16" and up, need to run somewhat faster to protect your drill from overheating.
9). Be patient – it takes a minute or so to remove the screw.
10). Start with moderate pressure and adjust it as necessary. More pressure slows the drill quickly; more power speeds the drill up most effectively.
11). When you feel the drill push up against your pressure, keep the drill running until the screw backs out of the hole. CAUTION: BOTH STUB AND UNSCREW-UMS ® WILL BE HOT.
12). To clear the UNSCREW-UMS ®, shift the drill into forward.
13). Force the screw to thread itself into a secured hardwood block.
14). When the screw stops turning, lift the drill and the UNSCREW-UMS ® will clear itself.
WARNING: sometimes the screw won't stop and yanking on the drill will tear the screw out of the block..........we don't know what to do at this point either. Send them back to us and we will replace the UNSCREW-UMS ®